The Form Center creates public forms for VPS service requests. A client can open a direct link or use an embedded form. Each valid submission creates a request in Requests.
Access And Roles
Signed-in broker Admin and Staff users can open Form Center. Both roles can view forms, copy form links, open forms, get embed code, and view submissions.
Only an Admin can make these changes:
- Create or edit a form.
- Activate or deactivate a form.
- Delete a form.
- Save Trusted IPs.
- Save Manage Embed Domains settings.
- Open Form Center under Integrations in the sidebar.
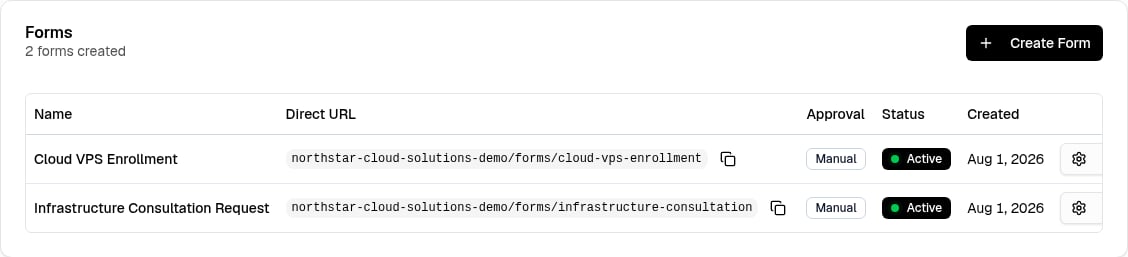 Each row shows the form name, Direct URL, Approval (Manual or Automatic), Status (Active or Inactive), creation date, and the Manage menu. The Manage menu contains the sharing actions (Copy Form URL, Get Embed Code, Open Form), View Submissions (opens Requests filtered to the form), and the status, edit, and delete controls.
The public URL controls are not available when the broker account does not have a slug. Contact support if the page shows Broker slug not set. Please contact support.
You must have the Admin role.
Each row shows the form name, Direct URL, Approval (Manual or Automatic), Status (Active or Inactive), creation date, and the Manage menu. The Manage menu contains the sharing actions (Copy Form URL, Get Embed Code, Open Form), View Submissions (opens Requests filtered to the form), and the status, edit, and delete controls.
The public URL controls are not available when the broker account does not have a slug. Contact support if the page shows Broker slug not set. Please contact support.
You must have the Admin role.
- Select Create Form.
- Complete the current step.
- Select Next.
- Repeat until you reach Notifications.
- Select Create Form.
The builder has these steps:
Select Previous to return to an earlier step. Select a completed step in the step list to return to that step. Select Cancel to close the builder without saving.
Setup
Enter a unique value in Form Name. The panel uses this name to identify the form. It also creates the form path from the name for a new form.
Description (Optional) helps your team identify the purpose of the form. The description also appears on the public form.
Select one value in Approval Settings:
Use an Auto Approval form internally only. Do not publish it for public
use. A valid submission starts VPS provisioning without a broker review.
Service And Plan Settings
The form always includes these required service fields:
- Requested Plan selects the VPS plan for the request.
- VPS Language selects the VPS language for the request.
To limit the plans that a client can select:
- Open the Design step.
- Select Fields.
- Open the edit menu for Requested Plan.
- Select Edit.
- Change the selections in Visible Plan Options.
At least one plan option must remain selected. Select Save Changes to keep the field changes.
Fields
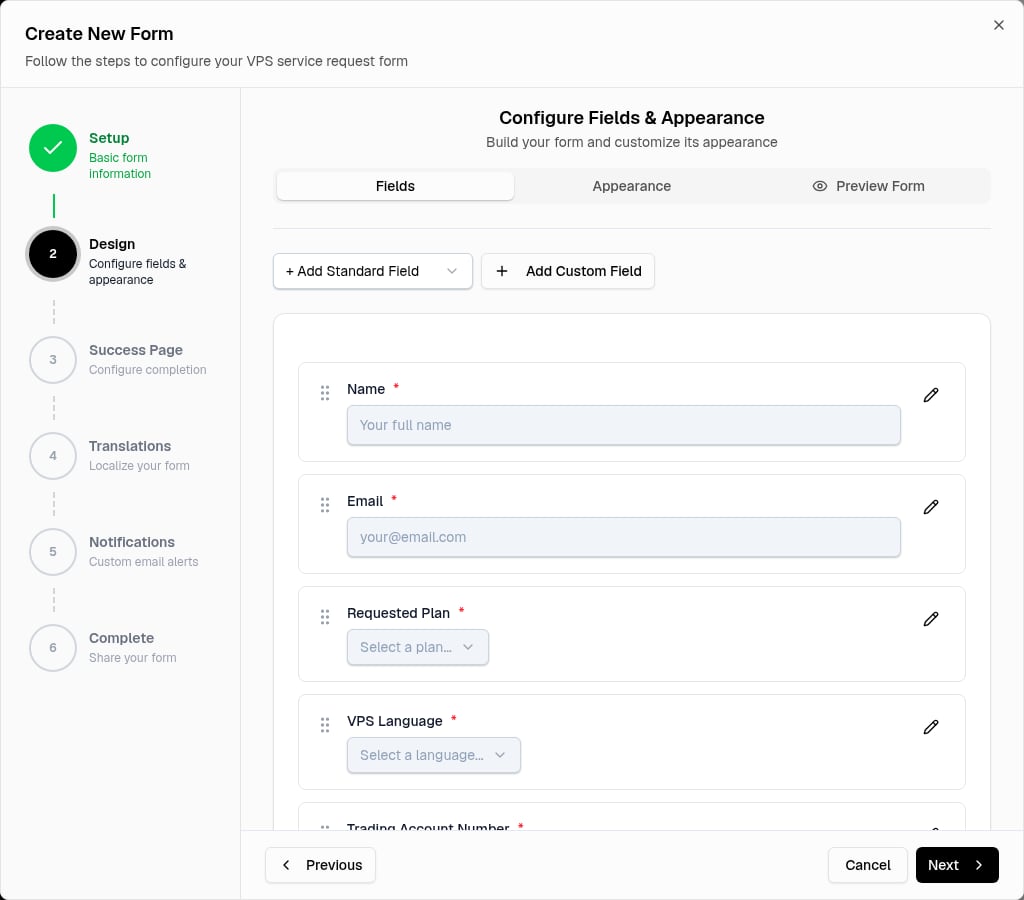 A new form contains these required standard fields. You cannot remove them:
- Name
- Email
- Requested Plan
- VPS Language
- Terms and Conditions
A new form also contains Trading Account Number. You can remove this optional field. Use + Add Standard Field to add an optional Phone, Trading Account Number, or Additional Notes field that is not on the form.
Use the drag handle to change the field order. Open a standard field’s edit menu to change Label, Placeholder, or Help Text.
For Terms and Conditions, set Content Type to External Link or Inline Content (Markdown). An external link uses Terms and Conditions URL. Inline content uses Terms and Conditions Content.
To add a custom field:
- Select Add Custom Field.
- Select a value in Field Type.
- Enter a value in Label.
- Complete the other field settings.
- Select Save Changes.
Field Type has Text, Textarea, Number, Select Dropdown, Radio Buttons, Checkboxes, Date, and URL. A select, radio, or checkbox field must have at least one value in Options (one per line). Select Required field when the client must complete the field.
A form must have at least one field. Each custom field must have a label.
Appearance
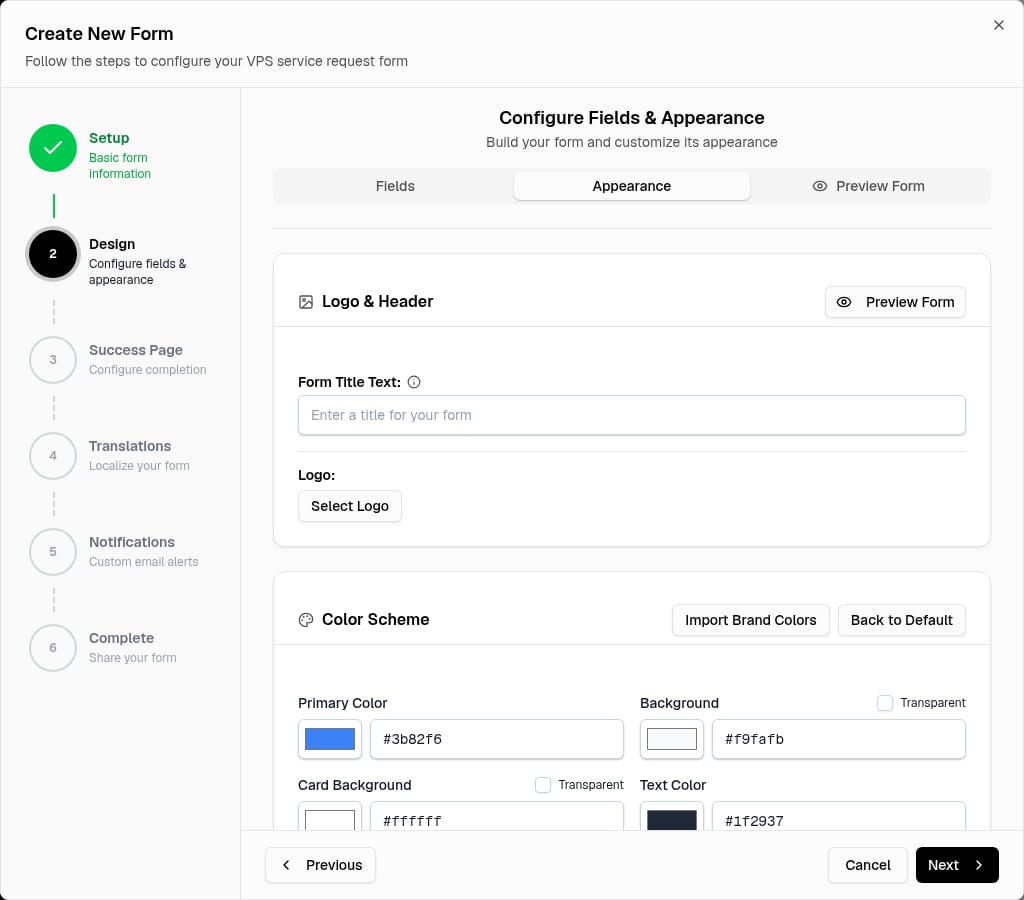 Select Appearance in the Design step. Use Preview Form to open a preview while you work.
Logo & Header controls the public form title and logo. Form Title Text can be empty. An empty value hides the title. Select Logo opens the broker brand assets. When a logo is selected, you can set Logo Position, Width (px), and Height (px).
Color Scheme controls Primary Color, Background, Card Background, Text Color, and Accent Color. Background and Card Background can be transparent. Import Brand Colors copies the saved broker brand colors. Back to Default restores the default form colors.
Form Customization has these groups:
Select Appearance in the Design step. Use Preview Form to open a preview while you work.
Logo & Header controls the public form title and logo. Form Title Text can be empty. An empty value hides the title. Select Logo opens the broker brand assets. When a logo is selected, you can set Logo Position, Width (px), and Height (px).
Color Scheme controls Primary Color, Background, Card Background, Text Color, and Accent Color. Background and Card Background can be transparent. Import Brand Colors copies the saved broker brand colors. Back to Default restores the default form colors.
Form Customization has these groups:
- Theme Preset has Compact, Default, and Spacious.
- Typography controls the font family and text sizes.
- Spacing controls Form Padding (px) and Field Gap (px).
- Layout controls Width, Border Radius, and Shadow.
Success Page
Success Page Settings controls what happens after a successful submission.
- Success Message displays a confirmation on the form.
- Redirect URL (Optional) sends the client to that URL instead of the success message.
The redirect URL must use HTTP or HTTPS.
Translations
The Translations step adds localized public form content. Each added language has its own form title, description, success message, and active field text.
To add a translation:
- Select a language in Add Language.
- Select Add Translation.
- Review the generated translation.
- Change the translated text when necessary.
Use Form Auto Translated to generate the content again. Use Remove to delete a translation. A translated form uses the selected locale in its direct link or embed code.
Notifications
Staff members who enabled pending request notifications receive notifications for manual form submissions. Use Additional Email Addresses (Optional) to add other recipients.
- Enter an email address.
- Select Add.
Use the delete control in Current Email Addresses to remove an extra recipient. The panel does not let you add an address that is already a staff notification address or is already in this list.
A new form is Active after the Admin selects Create Form. The Complete step shows the Direct Link and Embed Code sharing controls. See Publish and Embed Forms for sharing, embedding, and slug requirements.
You must have the Admin role.
- Find the form in Forms.
- Select Manage.
- Select Edit Form.
- Change the required settings.
- Select Update Form in Notifications.
The builder closes after a successful update. The saved changes apply to the public form.
An Admin can change a form’s status from its Manage menu. An Active form accepts public submissions; an Inactive form does not. See Publish and Embed Forms for activation and publishing details.
You must have the Admin role. The delete action cannot be undone.
- Find the form in Forms.
- Select Manage.
- Select Delete Form.
- Review the Delete Form message.
- Select Delete.
If the form has submissions, the confirmation shows the submission count. Deleting the form does not delete its submissions. The requests remain in request history.
Form Settings contains broker-wide Trusted IPs and Manage Embed Domains controls. Only an Admin can change these settings. See Publish and Embed Forms for setup, rate-limit, and security details.
Resulting Requests
Each valid form submission creates a New Service request with the Form source. The form’s approval setting controls whether the request stays pending for review or starts automatic approval. See Publish and Embed Forms for submission-review details.